Strengthen & Deploy
Learning outcomes - Debug Shiny apps and understand them from the inside - Supervise and test Shiny apps for robustness (appendix) - Convert simple Shiny apps to static website using shinylive - Deploy any Shiny app to the web using shinyapps.io
1 Deploying Shiny apps
- When running a Shiny app using
runApp(), you host it on a local server, i.e. it remains in your local network - Deploying a Shiny app means making your app available to other users!
- Deployment is the last step of app development
1.1 Strengthen
- Before it’s time to deploy, it’s a good idea to make sure your app passes the test of publicity
- Depending on the use case and target group, a deployed app should be:
- fast: remote communication can make your app slower than on a local host
- scalable: a high workload can crash your app
- stable: errors also crash your app
1.2 Tools to strengthen
- There are a lot of Shiny extensions that help in strengthening a Shiny app, some of which we will address:
profvis: Profiles a Shiny app and creates performance visualizationsreactlog: Logs reactivity of your Shiny app and creates a dynamic reactive graphshinyloadtest: Simulates a workload of users and determines how well your app is suitable for such a workloadshinytest: Creates snapshots and compares the visual appearance of them in subsequent runsshiny::testServer(): Performs programmatic tests using the Shiny server logic of an app
1.3 Further resources
2 Debugging Shiny apps
- Debugging Shiny apps is a unique challenge as Shiny code is not linear like regular R code
- Setting breakpoints is unreliable and only supported in RStudio
- Here, we introduce three ways to debug a Shiny app:
- Interactive debugging
- Print debugging aka logging
- Reactivity logging
2.1 Interactive debugging
- Interactive debugging comes from base R and works just like that
- Put a call to
browser()somewhere in your server function - Code execution is interrupted on the spot and you can explore the server function in a “frozen” state

input in Shiny browser call2.2 Logging
- In base R, print debugging is frowned upon
- In Shiny, print debugging can be a nice way to understand errors along a reactivity path (or to understand reactivity in general)
2.3 Where am I?
- That is a question you might ask yourself occasionally when encountering errors in Shiny
- The
whereamipackage can tell you exactly where you are - Many R packages enable general logging (
logging,logger,log4r), butwhereamiis especially suitable for Shiny

logger
whereami2.4 Reactivity logging
- Reactivity logging means capturing and visualizing reactive dependencies in Shiny apps
- Useful for detecting overreactiveness and reactive instabilities
- Reactivity logging can be done using the
reactlogpackage
2.4.1 Using the reactlog package
- Run
reactlog::reactlog_enable()before running the Shiny app or setoptions(shiny.reactlog = TRUE) - Do stuff in your Shiny app (particularly something that triggers dependencies!)
- Run
shiny::reactlogShow()orreactlog::reactlog_show()after closing the app - Alternatively, press
Strg + F3while the app is running
3 Deployment
- The deployment of Shiny apps is restricted to servers that support Shiny apps
- You can either set up a custom Shiny server or use a server provider
3.1 Deployment options
| Name | Use | Requirements |
|---|---|---|
| shinyapps.io | Casual to professional applications | rsconnect R package |
| Posit Connect | Professional to corporate applications | rsconnect R package |
| Shiny Server / self-hosting | Setting up self-hosted Shiny servers | Shiny Server on a Linux server |
| ShinyProxy / Heroku / Hugging Face | Deployment of containerized applications | Docker |
| Shinylive | Simple applications in an embedded setting | An existing static website |
| GitHub / CRAN / BioConductor | Applications for researchers or developers | Proficiency in R package development |
4 Shinylive
- Shinylive is one of Posit’s new things
- An application deployed with Shinylive does not need a server: It is a static website!
- This is possible primarily due to developments in what is called WebAssembly (Wasm)
- If you are interested in the magic behind Shinylive and Wasm, check out Joe Cheng’s talk at posit::conf(2023)
4.1 Whats so cool about Shinylive?
- You can simply embed your Shiny app:
- In your personal website
- In your Quarto/RMarkdown document
- In your package documentation
- In another Shiny app (do try this at home)
4.2 R packages
- Running R in the web is powered by the WebR framework
- Not all R (or Python) packages are available in WebR
- R packages need to be built for wasm
- If a package’s dependency cannot be built for wasm, it is not usable
- Only binary packages can be built
- Some features simply do not work:
system()or any other system commands- Database connections
- Parallelization
- You can check which packages are built for wasm here (currently about 14,000 packages are available)
4.3 Other Limitations
- Can be quite slow on startup
- Code and data are fully visible in the source code (thus not useful for sensitive data)
- App runs on the client machine and can thus be very slow and demanding
- The framework is in early development and debugging can be a real hassle
4.4 Downloading assets
- Shinylive is actually a library of web assets that run R in the background
- The
shinylivepackage needs these assets to turn a Shiny app into HTML code
4.5 Creating the app
- The
exportfunction creates a new directory, installs all WebR packages, and provides all asset files used to
- In theory, the resulting HTML document can now simply be opened
- In practice, however, the HTML document must be opened on a static server, e.g. using the
httpuvpackage:
4.6 Embed Shinylive in Quarto
- Quarto supports Shinylive through the
shinyliveextension
- In the YAML header, specify the
filterskeyword
filters:
- shinylive- Shinylive code chunks must be marked with
shinylive-rorshinylive-python - Four additional options are defined:
standalonespecifies that the code chunk contains an entire appcomponentsspecifies whether to show a code editor next to the rendered applayoutspecifies whether to show the components vertically or horizontally alignedviewerHeightspecifies the height of the app viewer in pixels
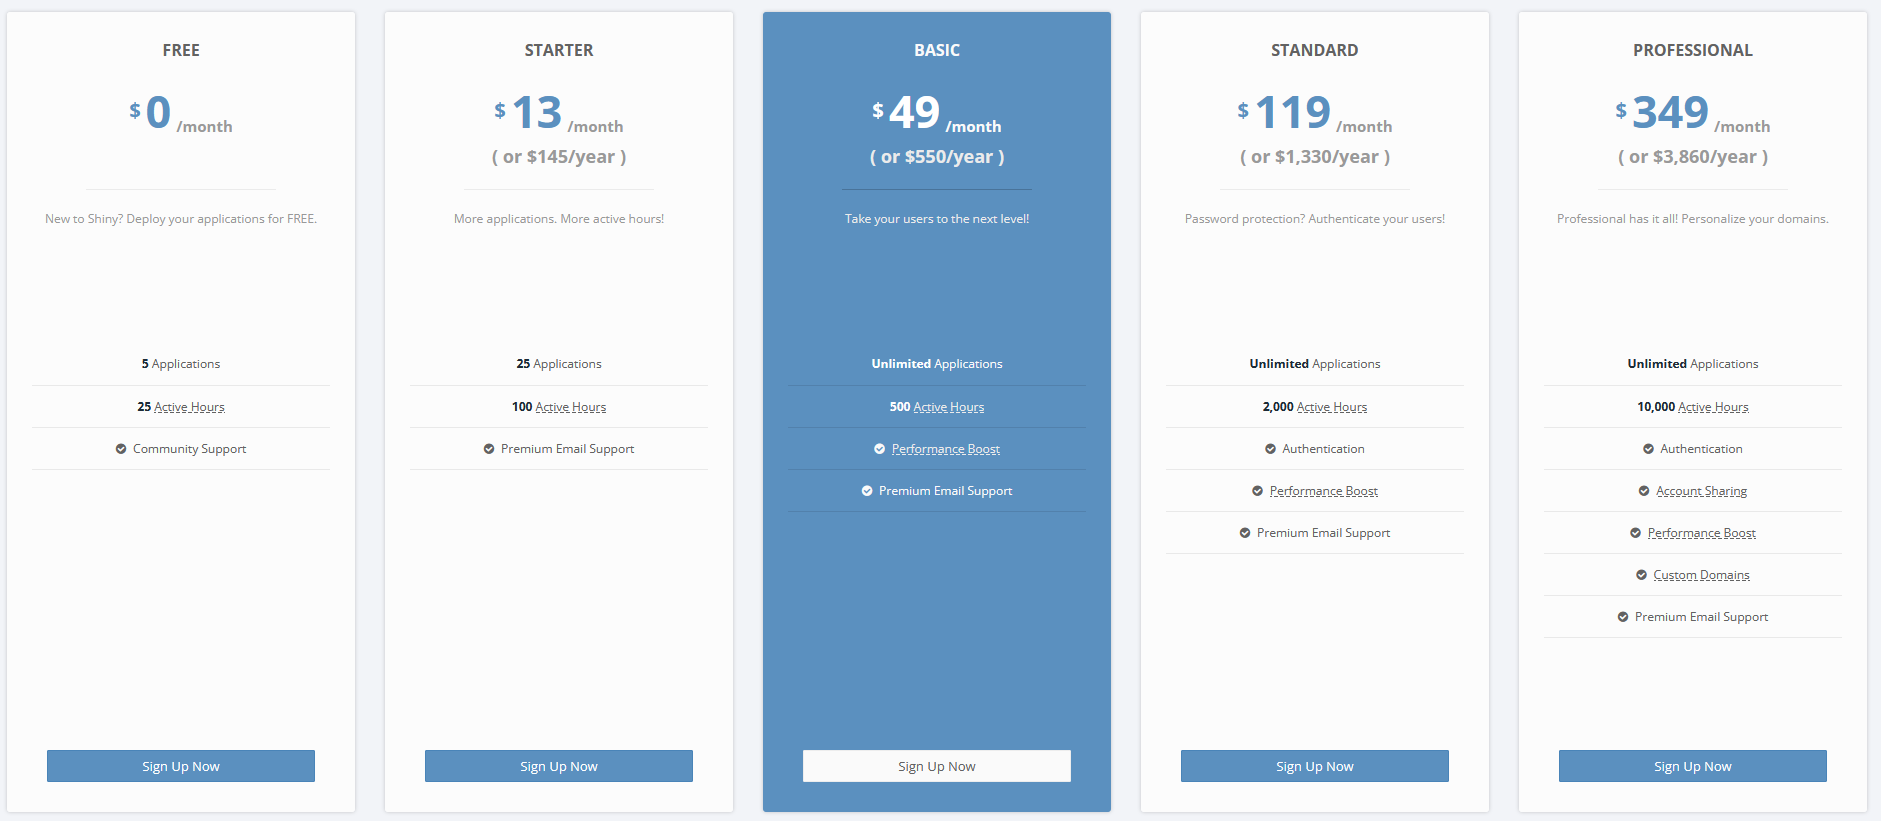
5 shinyapps.io
- A common choice for more casual Shiny apps is shinyapps.io
- It requires not much technical knowledge to deploy
- It does not require a pre-existing infrastructure (e.g., a server)
- It offers a free plan
5.1 rsconnect
- Both for Posit Connect and shinyapps.io you need the
rsconnectpackage rsconnectenables the communication between the Posit services and R
rsconnectis built around thedeployApp(),deployAPI()anddeployDoc()functions
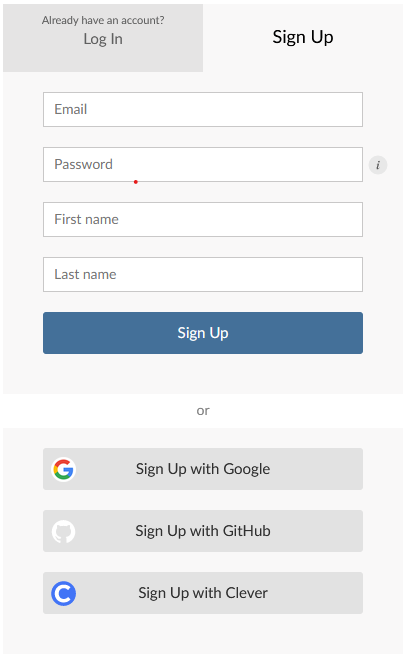
5.2 Creating an account
- Before being able to deploy to Shinyapps, we need an account
- Accounts can be created per Email or using Google, Github or Clever
5.3 Connecting R to shinyapps.io
- Just with any interface, linking works using Tokens and Secrets
- On your shinyapps dashboard, navigate to Account -> Tokens on the sidebar
- Click on “Add Token”
- Click on “Show” next to your newly created token
- Paste the code into your console and execute
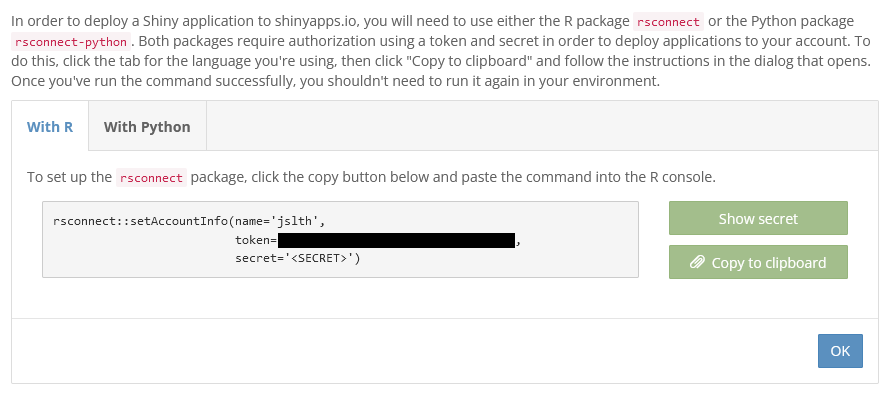
rsconnect5.4 Deploy!
- To verify that the verification process was successful we run:
- Finally, to deploy an app, we simply run
deployApp()to deploy anapp.Rin the current working directory to shinyapps.io:
6 Appendix: Performance profiling
- Profiling means recording how much time and memory certain actions in your Shiny app need
- Useful for testing performance or speed of your app
- Performance profiling in Shiny can be done with the
profvispackage
6.1 Interpreting flame graphs
- Flame graphs are a tool to quickly visualize performance of individual parts of an app
- They consist of two-dimensional “function boxes” which represent an individual function call
- The width of a function box indicates the time it took to process the function call
- The stacked height of function boxes indicates their ancestry. The lower boxes are the parents and the upper boxes are their children, i.e. the lower boxes call the upper boxes

6.2 Using the profvis package
- Simply run your app within a
profvis::profvis()call:
Note
It is necessary to use runApp(), shinyApp() does not suffice!
- Then, perform some tasks in the Shiny app
- Close the app and a flame graph will be created
- Note the color scheme:
- Yellow boxes correspond to specific lines in the code
- Blue boxes correspond to output objects
- Grey boxes correspond to garbage collection
7 Exercises
Exercise 1
Export your Shiny app as a static Shinylive webpage using the shinylive package.
To prevent problems ahead of time, make sure that you are running the newest version of the Shinylive package and web assets. The latest shinylive version can be downloaded from GitHub:
The latest assets version can be retrieved using shinylive::assets_version()
Exercise 2
Deploy your Shiny app using shinyapps.io. If necessary, create an account, and then follow the instructions.
Study the documentation of ?rsconnect::deployApp() to learn about possible deployment configurations.